Hardware product design

Commercializing a 3D vision scan table

Industrial design

Context

CapSen Robotics specializes in 3D vision and motion-planning software that gives robotic arms the spatial intelligence to pick and sort random, cluttered objects. To detect and manipulate these parts, the vision system first requires a complete 360-degree digital mapping of the object to train the model.

Context

CapSen Robotics specializes in 3D vision and motion-planning software that gives robotic arms the spatial intelligence to pick and sort random, cluttered objects. To detect and manipulate these parts, the vision system first requires a complete 360-degree digital mapping of the object to train the model.

Challenge

The 3D vision team relied on a rudimentary, unmarketable scanning rig, preventing CapSen from bundling a professional hardware asset with their cutting-edge 3D vision software for enterprise clients.

Challenge

The 3D vision team relied on a rudimentary, unmarketable scanning rig, preventing CapSen from bundling a professional hardware asset with their cutting-edge 3D vision software for enterprise clients.

Solution & Impact

Transformed a low-fidelity internal prototype into a commercialized product bundled directly into CapSen’s official vision kit, streamlining the 3D-data ingestion pipeline while significantly elevating company brand presence during client deployments.

Role

Lead product designer

Duration

4 months

Company

CapSen Robotics

Skills

CAD

3D printing

Design for manufacturing (DFM)

Hardware-software integration

COTS sourcing

Vendor sourcing

Brand design

Tools

Autodesk Fusion 360

MakerBot

"How might we elevate a low-fidelity, makeshift internal scan table into a premium, mass-manufacturable commercial asset to a 3D computer vision system?"

Professionalization

The existing scanning setup was a rudimentary rig built off an old record player that did not represent the company brand or look professional when sold to clients as part of the vision system kit.

Low-volume production

The system needed to be redesigned using high-quality but affordable off-the-shelf components and local manufacturers for a production volume of 10s or 100s of units that could be assembled in-house.

System integration

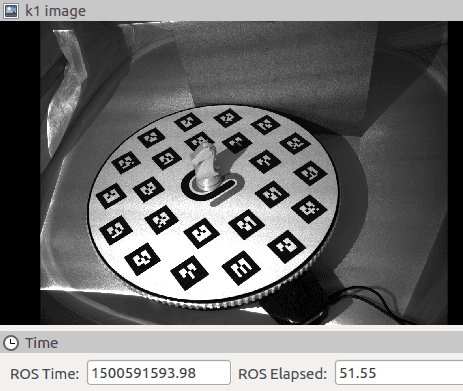
The scanning system required a reliable and programmable rotating mechanism with clear location markers so the computer vision system had a precise reference point for the 360-degree scan.

Process

1

Defining requirements

I was given full agency in conducting this project, so I wanted to establish requirements and constraints to guide my process forward:

  • Production scale: The redesign would be based on a projected production run of tens or hundreds of units, rather than thousands

  • Aesthetics & durability: The unit had to look professional, align with the company brand, and be highly durable.

  • Cost & assembly: The design needed to utilize high-quality, affordable off-the-shelf components, leverage local manufacturers to avoid high tooling costs, and be simple enough to assemble entirely in-house.

1

Defining requirements

I was given full agency in conducting this project, so I wanted to establish requirements and constraints to guide my process forward:

  • Production scale: The redesign would be based on a projected production run of tens or hundreds of units, rather than thousands

  • Aesthetics & durability: The unit had to look professional, align with the company brand, and be highly durable.

  • Cost & assembly: The design needed to utilize high-quality, affordable off-the-shelf components, leverage local manufacturers to avoid high tooling costs, and be simple enough to assemble entirely in-house.

2

Research & prototyping

Research & Modeling: Analyzed the mechanics of the record-player setup and brainstormed alternative methods to achieve controlled rotation. I then mocked up different mechanical layouts and component possibilities in CAD, integrating chosen off-the-shelf parts like casters and a gear band perimeter.

Prototyping: Built a physical, functional intermediate prototype in the shop to test the mechanism. This was constructed out of painted MDF, bearings, and casters, utilizing the planned gear teeth system, a 3D-printed motor housing, and a printed top.

Mechatronic programming: Wired and programmed an Arduino micro-controller to drive the 360-degree bidirectional servo motor within this physical assembly, testing the electrical and gear integration directly.

Challenge:

  • Arduino programming: My experience with electronic hardware and Arduino programming was limited, so I self-studied to implement the proper mechanics and code.

  • Adding threads to a 3D print: For the housing assembly I needed some parts to screw into the housing. However, with the technology we had available it was not possible to print threading. So, I designed the housing in a way that nuts could slide and click into the housing, providing the threads.

Early protoype of the scan table, including the top, the base, and the assembled constrction.

3

Refinement and vendor handover

Design optimization: Evaluated the performance of the shop prototype. Based on the mechanical tests, I implemented direct improvements to the bearing system for smoother and more concentric rotation and added physical cutout handles to the base disk to make the entire assembly easier for operators to transport and set up.

Professional fabrication: Figured out how to transition the iterated prototype to a professional manufacturing standard. I located local manufacturers capable of handling low-volume fabrication, finalized the production CAD models, and generated 2D technical drawings for the CNC-machined components alongside vector graphics for the top sticker.

3

Refinement and vendor handover

Design optimization: Evaluated the performance of the shop prototype. Based on the mechanical tests, I implemented direct improvements to the bearing system for smoother and more concentric rotation and added physical cutout handles to the base disk to make the entire assembly easier for operators to transport and set up.

Professional fabrication: Figured out how to transition the iterated prototype to a professional manufacturing standard. I located local manufacturers capable of handling low-volume fabrication, finalized the production CAD models, and generated 2D technical drawings for the CNC-machined components alongside vector graphics for the top sticker.

Solution

Base and top: Machined the primary top and base disks from black HDPE, delivering a sleek, professional matte aesthetic.

Rotation: Implemented a triple-caster set up paired with a central cylindrical bearing to ensure perfectly concentric, wobble-free 360-degree rotation during camera calibration.

Partial exploded assembly of the scan table showing the assembled base with castors, bearing, and handles, with the table top floating slighly above.

Cohesive shape semantics: Enclosed the Arduino and servo motor in a custom 3D-printed housing, utilizing curved geometries that wrap organically around the circular table footprint.

Positive-drive gearing: Engineered a custom 3D-printed gear head that meshes directly with an outer toothed gear band to completely eliminate mechanical slip during programmatic rotation.

Moutor housing being mounted to the bottom of the table base.

Spatial tracking interface: Integrated a high-contrast, scratch-resistant vinyl decal featuring geometric location markers that give the vision software instant coordinate references, even for partially occluded objects.

Embedded identity: Positioned premium CapSen branding and colors directly on the top surface, ensuring maximum brand visibility.
Complete scan set up including the assemble scan table and kinect camera.

Were the challenges met?

Professionalization

Elevated the scan table by using high quality components and incorporating branding throughout the product.

Low-volume production

Worked with local fabricators, mixed with off-the-shelf components and in-house assembly, to produce small batches and keep costs low.

System integration

Included location markers on the scan table and provided a programmable microcontroller set-up for team to seamlessly integrate it into their scanning system.

Reflections

My role: Sole end-to-end product designer.

What went well

Small-scale manufacturing: A good balance was met between industrial fabrication and in-house assembly, with use of both custom and standardized parts, to hit the sweet spot of a small-scale commercial MVP product.

Continuous learning: This was my first time producing a full-scale commercial product, and I am quite proud of the independence and resourcefulness I exhibited in taking this from prototype to fabricated product. I taught myself a lot of new skills such as Arduino-servo programming, hardware sourcing, and manufacturer/vendor sourcing.

What could be better

Too independent: This being my first end-to-end product, I felt I had to prove my capabilities and relied too much on my own research and skills. Looking back, I would used my network and the experts in my community more during each phase of the project to lessen the load and improve on my ideas.

What could be better

Too independent: This being my first end-to-end product, I felt I had to prove my capabilities and relied too much on my own research and skills. Looking back, I would used my network and the experts in my community more during each phase of the project to lessen the load and improve on my ideas.